SAML Servers
SAML stands for Security Assertion Markup Language, and is a single sign-on protocol. It is a standard method used to exchange authentication and authorization data between parties. SAML authentication allows your institution to provide SSO capability through your SAML Identity Provider (IdP). MAPS is added to the SAML IdP server as a service provider (SP).
SAML 2.0 can simplify access to applications for your users and eliminate the need to administer unique passwords and duplicate credentials for MAPS. Using SAML authentication with MAPS provides a unified user experience across the applications at your institution.
The SAML authentication feature for MAPS allows your users to authenticate to MAPS using the credentials from your SAML Identity Provider (IdP) server, which is also known simply as the IdP. During configuration, the SAML IdP server and the MAPS server (the service provider) exchange metadata files. These metadata files allow the SAML IdP to authenticate users who are members of the groups permitted to use the MAPS services.
Once the SAML authentication feature is installed and configured, users select a Use Single Sign-On button on the login dialog for the eLauncher. Users are redirected to your institution's SSO login page where they enter their credentials. When users are authenticated by the SAML server, they are granted access as usual.
An IdP initiated sign-on protocol may also be configured if desired. This option allows the authentication protocol to initiate on the SAML side and communicate the user information to MAPS.
SAML Server Configuration and Set Up
Prerequisites
- Your IdP server must support the SAML 2.0 protocol.
- You must be running MAPS version 6.3 or later.
- MAPS must be configured to run HTTPS (secure HTTP).
Configure SAML Single Sign-On Options
Before you can configure SAML authentication, gather the following information for your facility:
| Option | Description | Examples |
|---|---|---|
| IdP Metadata URL | The URL of the metadata file (from the SAML IdP) | https://example.com/idp/metadata |
| Issuer | Domain name of the MAPS server | internal.myservers.com |
Select Single Sign-On from the configuration menu to display the list of existing SSO servers.
Select a server from the list, or select Add Server to configure a new server. When the Edit Single Sign-On Server dialog box displays, select SAML as the server type from the first drop down.
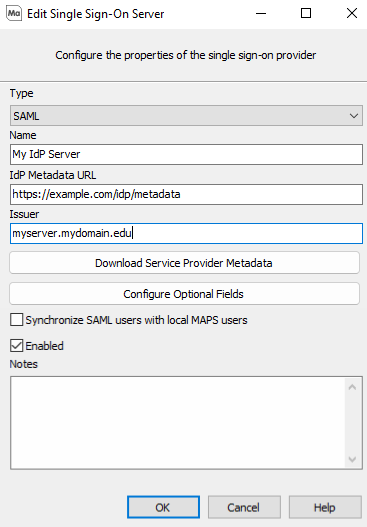
Set the connection parameters as follows:
- Name: This is the name of the SSO server in MAPS, and will be used within connection messages and in logs.
- IdP Metadata URL: The location of the SAML IdP metadata file. You should be able to display the metadata file in your browser using this URL.
- Issuer: The domain name of MAPS. This domain must be accessible from the SAML IdP server. Otherwise, you need to use the fully qualified domain so that MAPS is accessible.
- Synchronize SAML users with local MAPS users: Use this check box to authenticate through matching of NameID and the user name in MAPS. It is recommended to leave this unchecked, especially in cases where user names may have similar spellings between different users. Example: A user named jdoe might be"Jane Doe" in SAML, but "John Doe" in MAPS.
- Use IdP certificate pinning for additional security: When enabled, the MAPS server checks the SAML certificate for IdP-initiated requests to ensure that it matches the certificate provided by the metadata URL. Authentication will fail if a match is not detected.
- Enabled: Use this check box to enable or disable use of the SAML IdP server. While you can configure multiple SAML IdP servers, you can have only one enabled at a time. When you enable a SAML IdP server, be sure to disable the others (un-check the Enabled box).
- Notes: Use this space to record any additional information.
Note: When the Synchronize SAML users with local MAPS users check box is unchecked, SAML Group users do not positively accumulate User Roles , Permissions, or Security from individually added users. When it is checked these items do positively accumulate.
Generate and Upload MAPS Metadata to the SAML IdP Server
- Select the Download Service Provider Metadata button. This prepares the download of the MAPS metadata file so that it can be used by the SAML IdP server.
- Name the file so that you can identify that it is associated with MAPS. (Use the MAPS server host name, for example.)
- Save the file to a location where you can access it when you are ready to upload it to your SAML IdP server.
- Upload the metadata file to the server. Refer to the documentation for your SAML IdP server for specific instructions.
Configure Users and Groups
When a user enters their username and password on the SAML login page, the SAML IdP server will return an assertion to MAPS if the user is validated. The response that the SAML IdP server sends to MAPS includes attributes that identify each LDAP and/or MAPS group that the user belongs to (within the IdP).
MAPS parses the assertion and examines each attribute with the value of memberOf for either the FriendlyName or Name.
If you are using LDAP groups, and the assertion provides the attributes in the format of a distinguished name (DN), MAPS parses each DN to determine if any LDAP groups in MAPS have a matching DN. If the LDAP group does include a matching DN, the user is granted the roles and permissions associated with that group. When there are multiple matching groups, the permissions associated with the roles in those groups accumulate.
If you only have MAPS groups, you must match the DN to a MAPS group. MAPS examines the assertion to see if the entire DN matches the name of a MAPS group. When the DN in the assertion returned for a user matches the name of the group defined in MAPS, the user is granted the roles and permissions associated with that group. When there are multiple matching groups, the permissions associated with the roles in those groups accumulate.
There may be additional attributes included in the assertion that MAPS can use as a custom field. These are explained in Configuring Custom Fields.
For more information on configuring groups to work with SAML authentications, see Using Groups with Single Sign-On.
Note: SAML authentication is not supported for users who are members of nested LDAP groups.
Troubleshooting Tip: You can look at the debug log in MAPS while attempting to log in through SAML to verify that the response from the SAML server is in the correct format.
Note: If the Synchronize SAML users with local MAPS users check box is checked on the Edit Single Sign-On Server dialog, then the typical requirement to be a part of a group in MAPS will no longer be required. Instead, users can gain access by matching up the NameID with the user name in MAPS.
SAML Authentication Example
The example below shows a portion of an assertion that the SAML server returns to MAPS for an authenticated user:
<saml2:AttributeStatement>
  <saml2:Attribute FriendlyName="memberOf" Name="memberOf"
    NameFormat="urn:oasis:names:tc:SAML:2.0:attrname-format:uri">
    <saml2:AttributeValue>
      CN=Report Writer,OU=Groups,DC=Evisions,DC=Example
    </saml2:AttributeValue>
    <saml2:AttributeValue>
      CN=Report Viewer,OU=Groups,DC=Evisions,DC=Example
    </saml2:AttributeValue>
  </saml2:Attribute>
</saml2:AttributeStatement>
In this example, if you are using LDAP groups, the SAML response tells MAPS that the user is a member of the Report Writer LDAP group and the Report Viewer LDAP group. MAPS and associated applications grant this user the permissions defined for those two groups.
If you only using MAPS groups, the name of the MAPS group must be named CN=Report Writer,OU=Groups,DC=Evisions,DC=Example or CN=Report Viewer,OU=Groups,DC=Evisions,DC=Example.
Note: The assertion must include the value of "memberOf" for either the FriendlyName= or the Name= in the attribute statement. You may not be able to control the value for the Name statement that is sent from your server. If that is the case, edit the FriendlyName value so that it is memberOf which will allow it to be recognized by MAPS.
Note that the list of groups returned by the SAML server may include groups that are not defined in MAPS, but are used for other applications throughout the enterprise. MAPS ignores these attributes.
Usernames in the SAML Assertion
If the assertion from the SAML server includes the NameID node, MAPS will use the value as the username. For example, MAPS will use b.jones as the username when the assertion includes the following:
<saml2:NameID>b.jones</saml2:NameID>
Some IdP configurations do not include the NameID node in the assertion by default. If the NameID node is not found, MAPS will search for a NameID attribute. (The NameID attribute can be added to assertions by configuring the SAML IdP, if necessary.) The NameID attribute will look similar to this for a username of b.jones:
<saml2:Attribute FriendlyName="NameID" Name="NameID">
   <saml2:AttributeValue>b.jones</saml2:AttributeValue>
</saml2:Attribute>
If the assertion does not include a NameID node or a NameID attribute, MAPS will produce an error message.
If the username specified by either the NameID node or the NameID attribute includes a space, MAPS replaces the space with an underscore character.
Configuring Custom Fields
Custom fields are used to map values from within the assertion sent from the IdP to variable values used by other applications such as Argos or proxy accounts (BANPROXY, for example).
To configure custom fields, select the Configure Optional Fields button on the Edit Single Sign-On Server dialog. This displays the Optional Fields dialog:
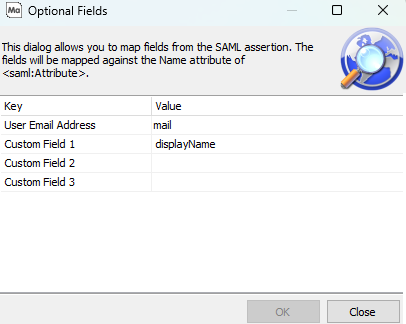
You can populate a user email address from the SAML assertion, and enter up to four optional field values.
MAPS examines the assertion from the SAML server, looking for a FriendlyName or Name attribute that matches the value for one of the optional fields. By default, MAPS uses the SAML response's memberOf attribute value to determine group membership. If your SAML server uses a different value, you may change this value in the Group Membership field. A star (*) wildcard may be used to match to any sub-string. For example, "*groups" will match Microsoft's group attribute URI "http://schemas.microsoft.com/ws/2008/06/identity/claims/groups".
In the following example, MAPS will be looking for FriendlyName or Name field matching the following:
- authenticationDate
- principalLdapDn
- uid
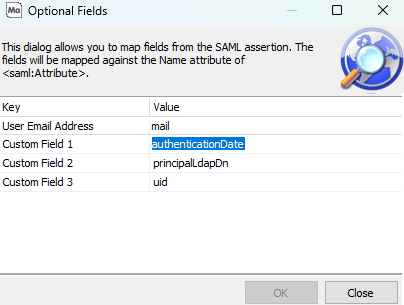
The snippet below is from an assertion returned by the SAML server. In this snippet, the second and third custom field values (uid and principalLdapDn) are used as values for the FriendlyName of an attribute.
<saml2:Attribute
  FriendlyName="uid" Name="uid" NameFormat="urn:oasis:names:tc:SAML:2.0:attrname-format:uri">
   <saml2:AttributeValue>
      Dex
   </saml2:AttributeValue>
</saml2:Attribute>

...

<saml2:Attribute
  FriendlyName="principalLdapDn" Name="principalLdapDn"
    NameFormat="urn:oasis:names:tc:SAML:2.0:attrname-format:uri">
   <saml2:AttributeValue>
      CN=dex,CN=Users,DC=Test,DC=Local
   </saml2:AttributeValue>
</saml2:Attribute>
- The attribute value of principalLdapDn (which is
CN=dex,CN=Users,DC=Test,DC=Local) will be passed as Custom Field 2 - The attribute value of uid (which is
Dex) will be passed as Custom Field 3
If the assertion does not include an attribute for authenticationDate, nothing is returned, and the Custom Field value is ignored.
If there are multiple values for an attribute, then only the first one in the list is set as the value for the custom field.
Using SAML to Sign In
The login process will look different depending on whether you have SP Initiated SAML or IdP initiated SAML configured.
SAML Single Sign-on - SP Initiated
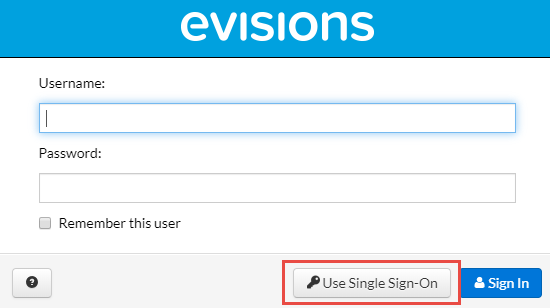
SP Initiated SAML is designed for the login process to start on the MAPS eLauncher page. Once the SAML server and the MAPS server are properly configured and communicating with each other, users would utilize the MAPS eLauncher URL to load the sign in page and select the Use Single Sign-On button to sign in. Note: the eLauncher sign in dialog can look different depending on the Single Sign-On Advanced Settings.
When users select the Use Single Sign-On button, they are redirected to the institution's IdP sign in page where they enter their credentials. If the authentication is successful, the users are redirected to the eLauncher and granted access to the MAPS pages and applications that they are authorized to access.
Require SSO Login
MAPS Administrators can find the Require SSO Login checkbox under the Advanced Settings tab. When checked, this option prevents non-administrative users from signing in to MAPS using local or LDAP credentials.
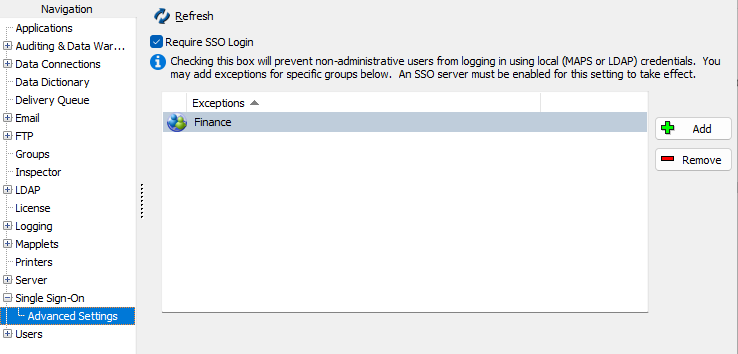
Instead of the usual sign in screen, users who are required to sign in using SSO will instead only be given the Use Single Sign-On button.
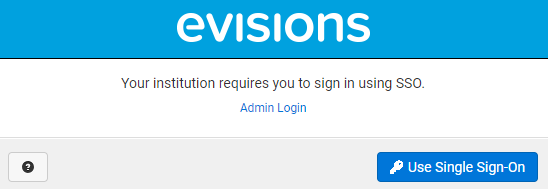
If your user has an Administrator role or is a member of one of the groups added to the exception list, then you can select the Admin Login button and sign in with your local (MAPS or LDAP) credentials.
Identity Provider Initiated Sign In
IdP initiated SAML authentication starts in the SAML server. With IdP initiated SAML, the SAML Administrator provides a special IdP initiated eLauncher or Argos Web Viewer link. The sign in process typically involves signing into your SAML server or institution portal and then selecting your link. Since you are already logged into SAML, you will automatically be redirected to the MAPS eLauncher or Argos web Viewer as an authenticated user and should not be prompted to login again.
Note: IdP initiated SAML authentication will often require additional configuration within the SAML server. This involves items like generating a URL that directs users to the eLauncher or Argos Web Viewer, and adding a link within the SAML portal that uses the URL. Please refer to your SAML server documentation for details on how to set this up.
Note: Regardless of you sign in method, some sensitive application users (example: IntelleCheck) may be prompted to re-enter credentials.